In this article26 sections
Roll-up banner design looks simple: a tall rectangle, your logo, a photo and a few words. Yet many retractable banners fail at the event or the entrance where they stand. The important message sits at the bottom, hidden behind a table. The text is too small to read from the aisle. The background photo is beautiful but the headline disappears into it. Or the banner tries to list every service, so nobody reads any of it.
This guide shares fifteen tips for roll-up banner design that gets noticed: choosing a size, designing for the eye-level zone, keeping the bottom clear, writing a headline, using photos and color, adding a QR code, choosing materials and stands, setting up print files correctly and adapting layouts for nail salons, spas, restaurants, cafés, bakeries, shops, lash academies and hiring events. A checklist and common mistakes close the guide.
What a roll-up banner is good for
A roll-up banner (also called a retractable banner or pull-up banner) is a printed graphic that rolls into an aluminum base and pulls up onto a pole in about a minute. It is portable, reusable and tall enough to be seen over crowds. Common uses:
- Events and trade shows: behind or beside a booth table.
- Shop entrances: welcome messages, services and promotions near the door.
- Restaurants: host stands, catering displays, seasonal menus.
- Markets and pop-ups: marking your booth from far away.
- Grand openings and hiring events: short-term messages that do not need a permanent sign.
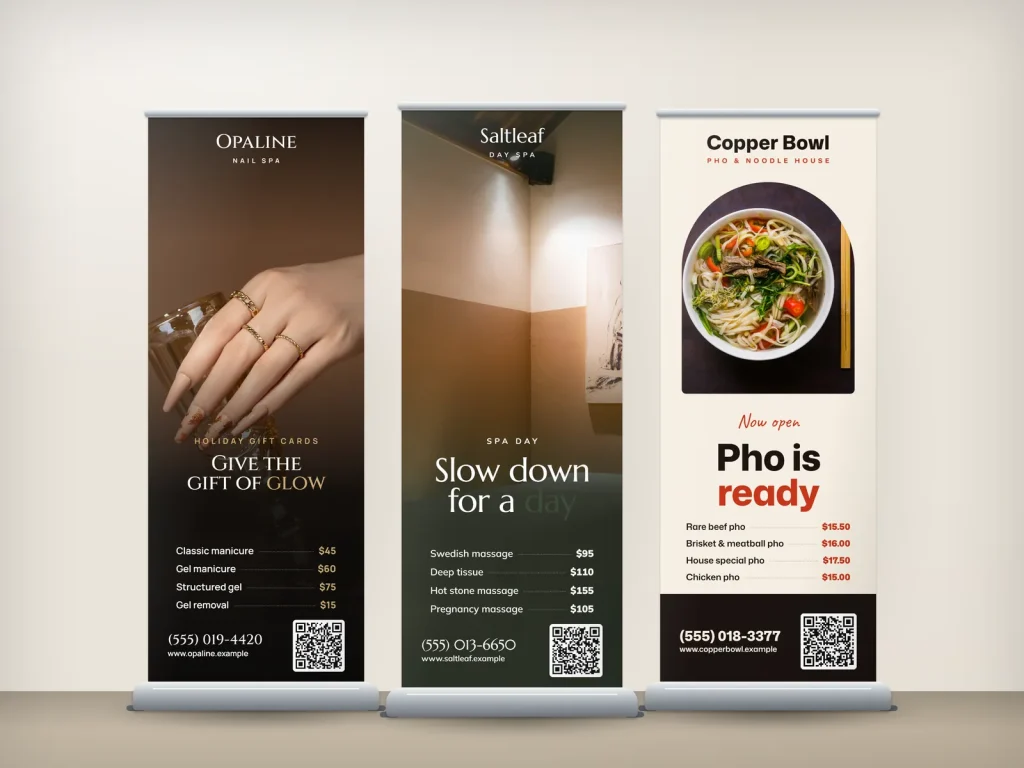
Dreamer prints roll-up banners with stands and carrying cases, ready to set up in a minute.
1. Choose the right size
| Size (width × height) | Best for |
|---|---|
| About 24 × 80 in | Narrow spaces, small booths, beside a door |
| About 33 × 80 in | The most common size for events and entrances |
| About 36 × 92 in or wider | Large booths, high ceilings, more visibility |
| 47 in wide or more | Backdrops, photo walls, large exhibitions |
For most small businesses, a banner around 33 × 80 inches balances visibility, cost and portability. Check the ceiling height and the floor space at your usual venues before choosing taller or wider stands.
2. Design for the eye-level zone
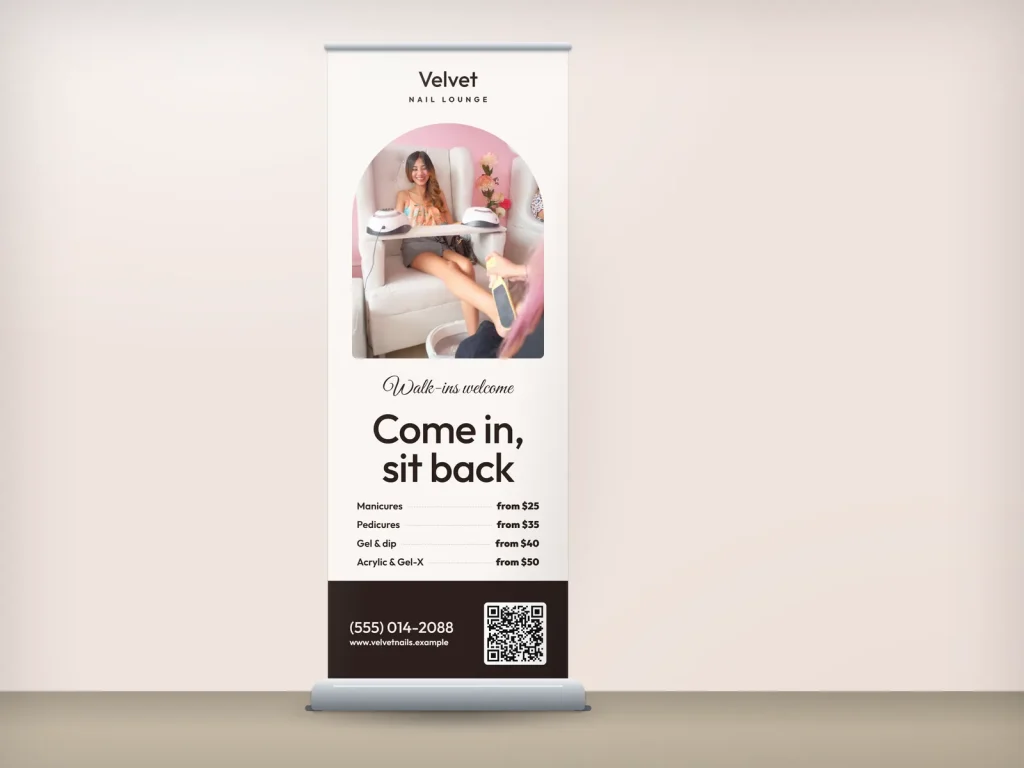
People standing or walking past look at roughly the top half of a banner first. Put the most important elements there:
- Logo near the top, clearly visible above crowds and tables.
- Headline in the upper third, at or slightly above eye level.
- Key image in the middle, supporting the headline.
The top is what people see from across a room; the middle is what they read when they approach.
3. Keep the bottom clear
The bottom 15 to 20 percent of a roll-up banner is often hidden by tables, chairs, boxes or people standing in front. Never put your phone number, website or QR code there. Use the bottom for background color, a simple pattern or the continuation of a photo. If you must include contact details, place them in the middle section.
4. Write a headline people read in three seconds
Your roll-up banner design should answer "Who are you and why should I care?" in a few words:
- Short: three to seven words.
- Specific: "Gel nails that last three weeks" beats "Quality nail care".
- Benefit-led: say what the visitor gets.
- Big: the largest text on the banner after your logo.
Avoid full sentences and paragraphs. A banner is a sign, not a brochure.
Headline examples that work
Strong headlines are short, concrete and written for the person walking by:
- "Gel nails that last three weeks" (nail salon)
- "Your 60-minute escape starts here" (spa)
- "Pho made with 12-hour broth" (restaurant)
- "Iced Vietnamese coffee, made to order" (café)
- "Custom cakes for every celebration" (bakery)
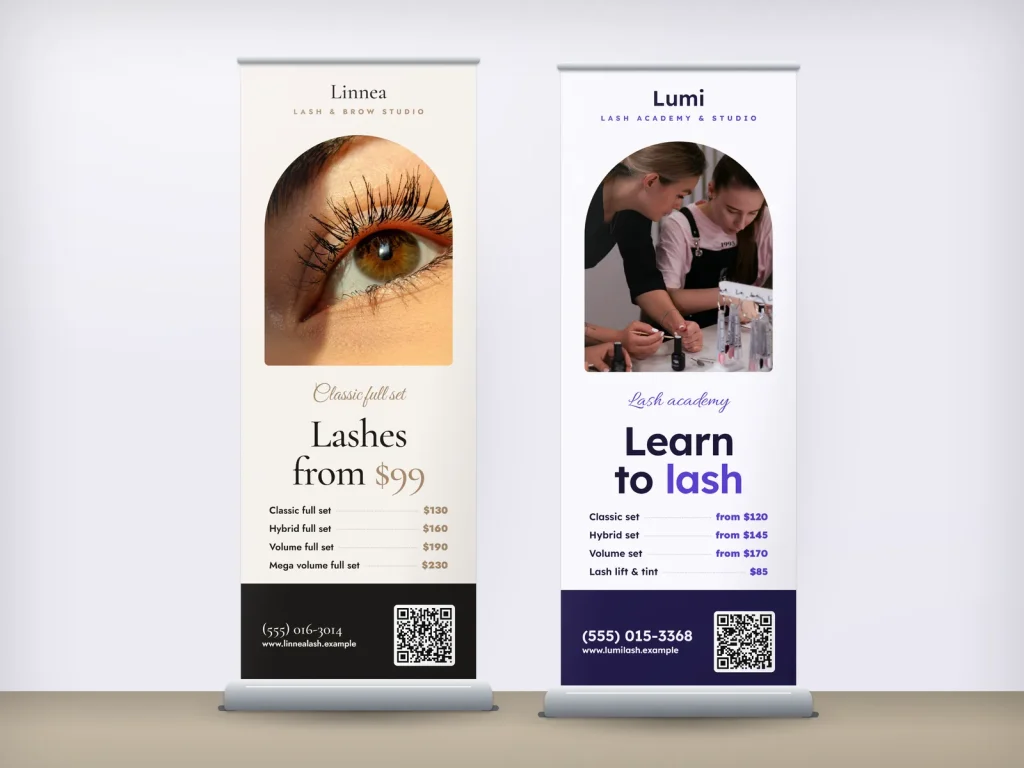
- "Learn lash extensions the right way" (lash academy)
- "We're hiring nail technicians" (hiring event)
Notice what they have in common: each names a specific product or result, uses everyday words and fits on two or three lines at a large size. Weak headlines such as "Welcome to our business" or "Quality and service" could belong to anyone, so they give visitors no reason to stop.
5. Use supporting points sparingly
Under the headline, add up to three short supporting points, such as services, a guarantee or a key fact: "Walk-ins welcome · Gift cards · Open Sundays". More than three points become a list nobody reads from a distance. Put detailed information in a flyer or brochure on the table instead; our premium flyers pair well with banners at events.
6. Choose one strong image
- One hero photo works better than a collage of small pictures.
- High resolution: banners are large, so phone photos often look blurry; use professional photos or images at full print resolution.
- Real images of your work or your space whenever possible.
- Leave quiet areas in the photo where text can sit without fighting the background.
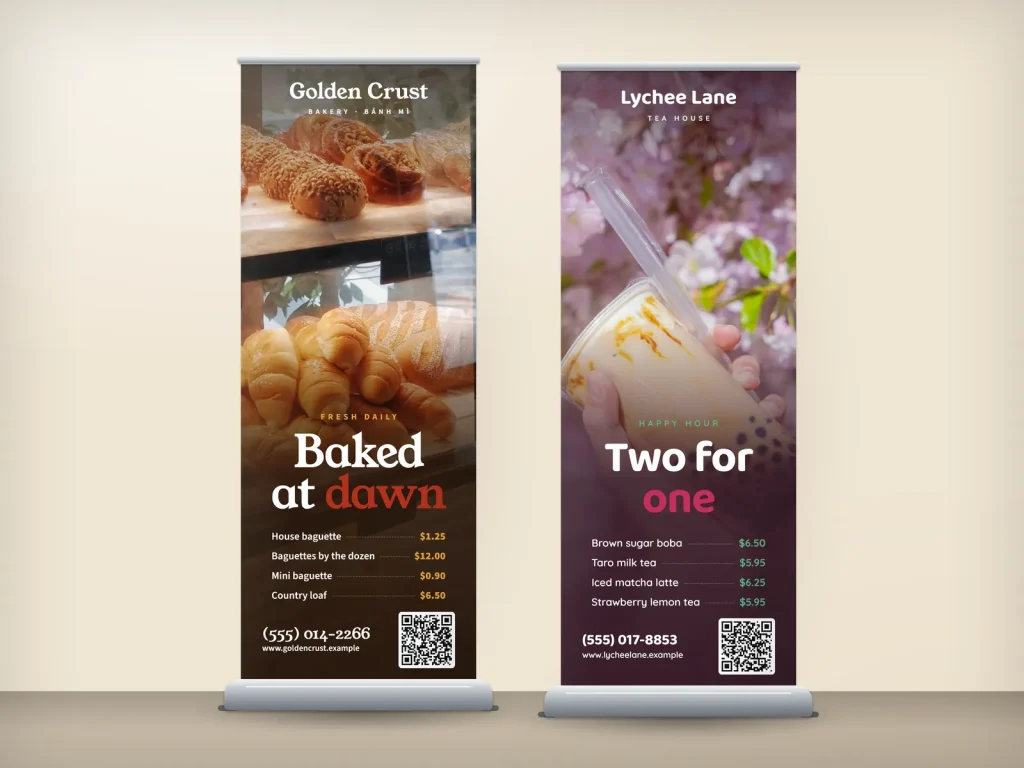
If the photo is busy, place the headline on a solid color panel or add a dark overlay behind white text.
7. Use color and contrast
- Brand colors for background panels and accents.
- High contrast between text and background: dark on light or light on dark.
- Limit the palette to two or three colors so the banner reads as one message.
- Consider the venue: bright event halls wash out pastel colors; dark venues make dark banners disappear.
8. Add a QR code in the right place
A QR code can take visitors to booking, a menu, a sign-up form or a special offer. Place it in the middle section at chest height, large enough to scan from a step away, on a white quiet background with a label: "Scan to book", "Scan for 10% off today". Test it with several phones before printing. Our guide to QR codes for salons covers sizes and testing.
9. Choose fonts for distance
- Bold sans-serif or solid serif fonts for headlines.
- No thin scripts for important words.
- Two fonts at most: one for headlines, one for supporting text.
- Generous letter spacing for small text so it does not blur at distance.
10. Pick the right material
- Vinyl banner material: durable and affordable, with a slight sheen.
- Polyester fabric: a matte, premium look that reduces glare under lights.
- Anti-curl materials keep edges flat after repeated rolling.
- Blockout layer: prevents light from showing through, so images stay bright even with a window or spotlight behind the banner.
Ask your printer which material suits your venue and how often you will roll the banner up and down.
11. Choose a stand that lasts
- Sturdy aluminum base that does not tip easily.
- Adjustable pole for different heights.
- Replaceable graphics so you can update the design without buying a new stand.
- Padded carrying case for transport.
A cheap stand that wobbles or jams makes your brand look careless, so it is worth choosing a solid one if you will use it often.
12. Set up print files correctly
- Use the printer's template with the exact visible area, bleed and hidden area that rolls into the base.
- Vector logos and text (AI, EPS, PDF) for sharp edges.
- High-resolution images at the final print size.
- Color mode as the printer requests, often CMYK.
- Outline or embed fonts so text prints as designed.
Always check the proof at a reduced scale on a large screen and imagine it at full height.
13. Layouts by industry
| Business | Headline idea | Image | Extra |
|---|---|---|---|
| Nail salon | "Walk-ins welcome. Nails done right." | Close-up of a fresh set | Gift cards, QR to book |
| Spa | "Relax. Recharge. Book your escape." | Calm treatment room | Packages, memberships |
| Restaurant | "Pho made with 12-hour broth" | Steaming bowl | Catering, order online |
| Café or bakery | "Fresh bread every morning" | Bread wall or pastries | Pre-orders, loyalty |
| Lash academy | "Learn lash extensions the right way" | Instructor with student | Class dates, QR to enroll |
| Shop | "New arrivals every week" | Product photo | Website, opening hours |
| Hiring event | "Now hiring nail technicians" | Team photo | Benefits, QR to apply |
Working with a designer
Give your designer what they need to get the roll-up banner right the first time: your logo files, brand colors, the main message, two or three supporting points, your best photos and where the banner will stand. Tell them what usually sits in front of it, such as a table or a reception counter, so they can keep important content above that line. Ask for a mock-up showing the banner next to a person for scale; it reveals text that is too small long before printing.
14. Combine banners with other signs
At events and entrances, a roll-up banner works with other pieces:
- A table cover or tablecloth in brand colors.
- An A-frame sign outside the shop door with today's message. See our guide to A-frame sign ideas.
- Flyers, business cards and stickers on the table. Our article on custom stickers for small business has ideas for event giveaways.
- A vinyl banner on the front of a booth table or above the shop for longer campaigns. See our vinyl banners.
Keep the same colors, fonts and headline across all of them so visitors connect the pieces.
15. Take care of your banner
- Roll it up slowly with the guide, never letting it snap back.
- Keep the graphic clean and dry before rolling.
- Store it in the case away from heat.
- Replace graphics when colors fade or information changes.
A well-kept banner can be used at many events, so a little care protects your investment.
Plan banners for a full season of events
If you attend several events a year, plan your roll-up banners as a set rather than one at a time:
- One evergreen banner with your logo, main service and a QR code to your website, used everywhere.
- One seasonal banner for holidays, bridal season or summer menus, swapped as the year changes.
- One offer banner for specific events, such as a market discount or an opening special.
Use the same template so the banners look like a family. Over a season, you will learn which headlines and images stop people, and the next order will be better.
Double-sided and backlit options
Some roll-up stands are double-sided, useful when the banner stands in the middle of a space and people approach from both directions. Lightbox and backlit options make banners glow in dark venues, but they cost more and need power. For most small businesses, a single-sided banner with a blockout material placed against a wall or at the back of a booth is the best value.
Roll-up banners inside your shop
A roll-up banner is not only for events. Inside a salon, it can introduce a new service near the entrance, promote gift cards before the holidays or explain a membership program in the waiting area. In a restaurant, it can announce catering or a seasonal menu at the host stand. Because it rolls away in a minute, you can change the message with the season without drilling holes in walls.
Accessibility and safety at events
Place banners where they do not block aisles, doors or fire exits, and keep the base away from walking paths so nobody trips. Make sure the stand is stable on uneven floors; outdoors, use weights and avoid windy spots, because roll-up stands are designed mainly for indoor use. Keep cables from lights or screens taped down and away from the banner base.
Budgeting and reuse
A good stand can last many events, while graphics wear and become outdated. Budget for the stand once and for new graphics each season or campaign. Reusing a sturdy stand with fresh graphics keeps your roll-up banner design current without buying new hardware every time.
Measure what your banner brings
At events, count booth visitors, QR scans, sign-ups or bookings during the event. At your shop entrance, ask new clients what brought them in and track redemptions of any banner-only offer. If a design brings little response, test a new headline or image at the next event. Because graphics can be swapped, roll-up banners are easy to improve over time.
Roll-up banner design checklist
- Logo and headline in the top third.
- Nothing important in the bottom 15 to 20 percent.
- Headline of three to seven words, readable from across the room.
- No more than three supporting points.
- One strong, high-resolution image.
- High-contrast colors in your brand palette.
- QR code at chest height, labeled and tested.
- Print file built on the printer's template with bleed.
Common mistakes
- Contact details at the bottom, hidden behind the table.
- Too much text, like a printed web page.
- Low-resolution photos that look blurry at full size.
- Text over busy images without a background panel.
- Thin script fonts for key words.
- A wobbly stand that makes the brand look cheap.
Frequently asked questions
What size is a standard roll-up banner?
Many roll-up banners are about 33 inches wide and around 80 inches tall. Narrower and wider sizes exist for small spaces and large booths.
What should be at the top of a roll-up banner?
Your logo and a short headline, in the upper third, where people look first from a distance.
Why shouldn't I put contact details at the bottom?
The bottom portion is often hidden by tables, chairs and people. Put phone numbers, websites and QR codes in the middle section instead.
How much text should a roll-up banner have?
A headline of three to seven words and up to three short supporting points. Detailed information belongs in flyers or brochures.
What material is best for roll-up banners?
Vinyl is durable and affordable; polyester fabric looks premium with less glare. Choose anti-curl material with a blockout layer so light does not show through.
Can I change the graphic on my roll-up banner?
Many stands allow the graphic to be replaced, so you can update designs for new seasons or events without buying a new stand.
Good roll-up banner design is about restraint and placement: a clear logo and headline at the top, one strong image, a QR code where people can scan it and nothing important hidden at the bottom. Choose a sturdy stand and quality material, set up files correctly and test new designs at each event. If you want a roll-up banner, flyers and table signs designed as one set, Dreamer's design and printing team prints for salons, restaurants and shops across the US, and the SBA's guide to marketing and sales is a useful companion for planning event marketing.
No time to do this yourself? We can do it for you.
Send your business name and ZIP code. We review your Google Maps, Yelp and Facebook presence and call you back for free.